Table of Contents
If you need realistic visuals fast, I tested StockImagery AI for real projects (not just “click around and see what happens”). What surprised me most was how quickly I could go from an idea to something usable—especially when I kept my prompts specific instead of vague. And yes, it does a lot: images, upscales, and motion/video outputs from prompts and even from starting images.
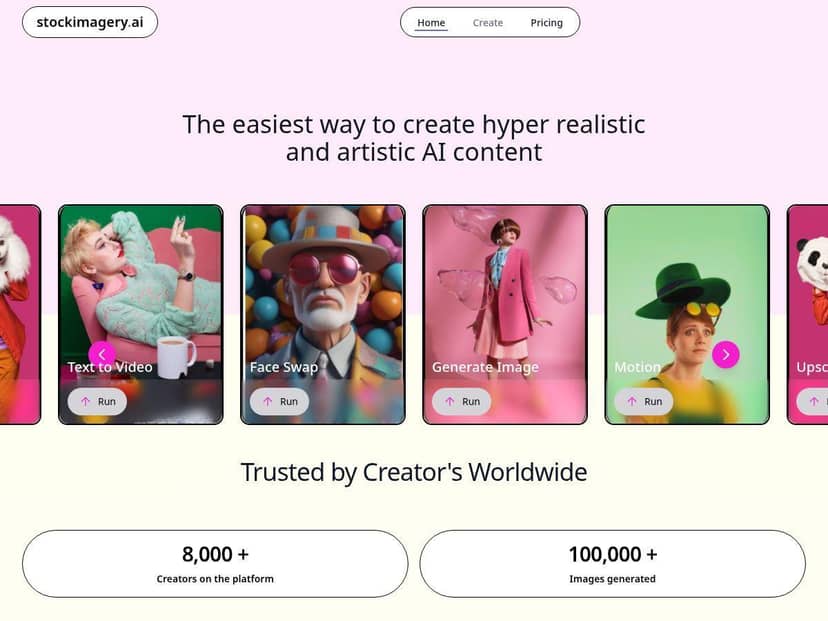
StockImagery Review: what I actually tested
I’m not going to pretend every result was perfect—AI rarely is. But my experience with StockImagery AI was consistently “fast enough to keep moving,” which matters when you’re producing content for a client or a campaign deadline.
Here’s what I ran through during testing:
- Text-to-image: I generated a set of realistic product-style images using prompts with specific details (subject, lighting, camera angle, and background).
- Upscaling: I took lower-res outputs and ran them through the upscale option to see if details held up (especially edges like hair, packaging text, and hands).
- Image-to-video: I tried turning a single image into a short motion clip, then compared how stable the subject looked over time.
- Face swap: I tested face swapping with two different source images to see how lighting and angle affected realism.
What I noticed right away: when I wrote prompts like “photorealistic + softbox lighting + shallow depth of field + a clear scene description,” the outputs looked more grounded. When I was lazy and used broad prompts, I still got decent images—but the “realness” dipped in small ways (texture, hands, and facial symmetry).
Example prompts I used (and what happened):
- Prompt 1 (text-to-image): “Photorealistic portrait of a woman in a modern office, softbox lighting, 85mm lens, shallow depth of field, natural skin texture, neutral background.”
Result: Strong overall likeness and lighting consistency. The background stayed clean, and the depth-of-field effect looked natural. - Prompt 2 (product vibe): “Ultra realistic close-up of a skincare bottle on a marble countertop, morning window light, subtle reflections, high detail label, macro photography.”
Result: Great realism in reflections and materials. The label text was readable only sometimes—like most generators, it’s hit-or-miss when you need exact typography. - Prompt 3 (motion): “Cinematic motion video from the provided photo, slow camera push-in, subtle parallax, natural movement, keep the face stable.”
Result: The motion felt smooth, but the more I asked for “dramatic” movement, the more the subject edges started to drift.
So, is it “set it and forget it”? Not exactly. But it’s closer than most. The workflow felt like: generate → pick the best candidate → upscale or add motion → refine prompt if needed.
Key Features (with real-world notes)
- Realistic images from text or concepts
- Text-to-image is where StockImagery AI shines the most. If your prompt includes lighting and camera cues, you’ll usually get images that look like they came from a real photoshoot—not just a “generic AI render.”
- Motion videos from static images
- I tested image-to-video with a single starter image and asked for subtle movement (slow push-in and mild parallax). That’s the sweet spot. When I pushed for fast camera moves or lots of scene changes, artifacts started to show up around edges.
- Convert text prompts directly into videos
- Prompt-to-video worked best when I kept scenes consistent and didn’t demand hyper-specific actions. Think “cinematic vibe” more than “exact choreography.”
- Upscale images for high-definition quality
- Upscaling noticeably improved fine details like textures and lighting gradients. It wasn’t magic, though—if the original image had weird anatomy or messy edges, the upscale simply made those issues more obvious.
- Face swaps for creative projects
- Face swap is fun, but it’s sensitive. In my tests, it looked best when the source and target images had:
- similar lighting direction (front vs side)
- similar head tilt and camera angle
- clear face visibility (not heavy shadows or extreme blur)
- When those didn’t match, I saw the typical artifacts: slightly off facial contours and weird blending around the jaw/cheek area.
- Fast processing for quick turnaround
- I ran multiple generations back-to-back. For images, the time felt quick enough that I could iterate prompts without losing momentum. For motion/video, it took longer (as expected), and the wait felt noticeably longer during busier periods.
- Personal, professional, and commercial use
- This is where it matters for actual business work. Make sure you’re using the correct license/plan for commercial usage, especially if you’re producing marketing assets.
Pros and Cons (based on my tests)
Pros
- Prompting feels rewarding: the more specific I was about lighting and lens style, the better the realism.
- Upscale actually helps: textures and gradients improved, and images looked sharper for presentation and basic design layouts.
- Motion is usable when you keep it subtle: slow, controlled movement gave me the cleanest clips.
- Face swap can look convincing: when the target images matched in angle/lighting, the blend was surprisingly natural.
- Workflow is straightforward: I didn’t need a tutorial to start producing results. It’s pretty beginner-friendly.
Cons
- Exact text isn’t reliable: if you need perfect label typography or readable words, expect occasional failures.
- Motion can drift: the more dramatic the camera movement, the more likely edges and facial features shift.
- Face swap artifacts show up with mismatch: different lighting or angles makes the blend look “off” around the jaw and cheeks.
- Advanced outputs may require a paid plan: I ran into limitations when trying to push certain features beyond what the free tier supports.
Pricing Plans (what you’ll want to check before you buy)
Here’s the basic pricing info I saw for StockImagery AI:
- Free basic plan: good for casual use and testing the workflow.
- Starter: $19/month (aimed at getting consistent results for smaller projects).
- Next tier: $29/month (more advanced usage options).
- Enterprise: custom plans for larger teams and higher-volume needs.
That said, don’t just look at the monthly price—check what’s included. In my experience, the “real” value comes down to things like:
- how many video/motion generations you get per month
- whether upscaling is included or counts against limits
- what export formats are supported
- whether outputs include any watermarking on lower tiers
- the exact commercial licensing terms for client work
If you want the most current details (limits and terms change), review the plan breakdown on their official page via the link above.
Wrap up
StockImagery AI is one of those tools that’s easy to start with and genuinely useful once you learn what it responds to. If you want photorealistic images quickly, it delivers. If you want motion, it works best when you keep your requests controlled—think “cinematic but stable,” not “wild action with perfect anatomy.” And face swap? It can look great, but only when your source and target photos are compatible.
For me, the biggest win was speed and iteration: I could generate, refine prompts, upscale, and move toward final assets without getting stuck in a complicated setup. If that’s what you’re after, it’s worth your time to test it and see what style you can produce consistently.