Table of Contents
Have you ever zoomed in on a product photo (or a landscape shot) and thought, “Why does this look so soft?” I’ve been there. Sometimes it’s because the original image was uploaded in a hurry, sometimes it’s because you’re working with older files, and sometimes it’s just plain resolution limits. Whatever the reason, low-res images don’t just look worse—they can make your whole project feel less polished.
That’s where ImageUpscaler comes in. It’s an online image upscaling tool that promises clearer results without you needing to wrestle with complicated software. In my experience, that “upload, pick a setting, get a better image” workflow is exactly what most people want when they’re trying to fix a file fast.

ImageUpscaler Review: Does It Actually Improve Low-Res Images?
ImageUpscaler is an AI-powered online tool built for one main job: enlarging images while keeping them looking natural. The headline feature is upscaling up to 16K resolution, which sounds huge on paper. But what I care about is what happens to real details—edges, text, fabric texture, and those “why is this blurry?” moments.
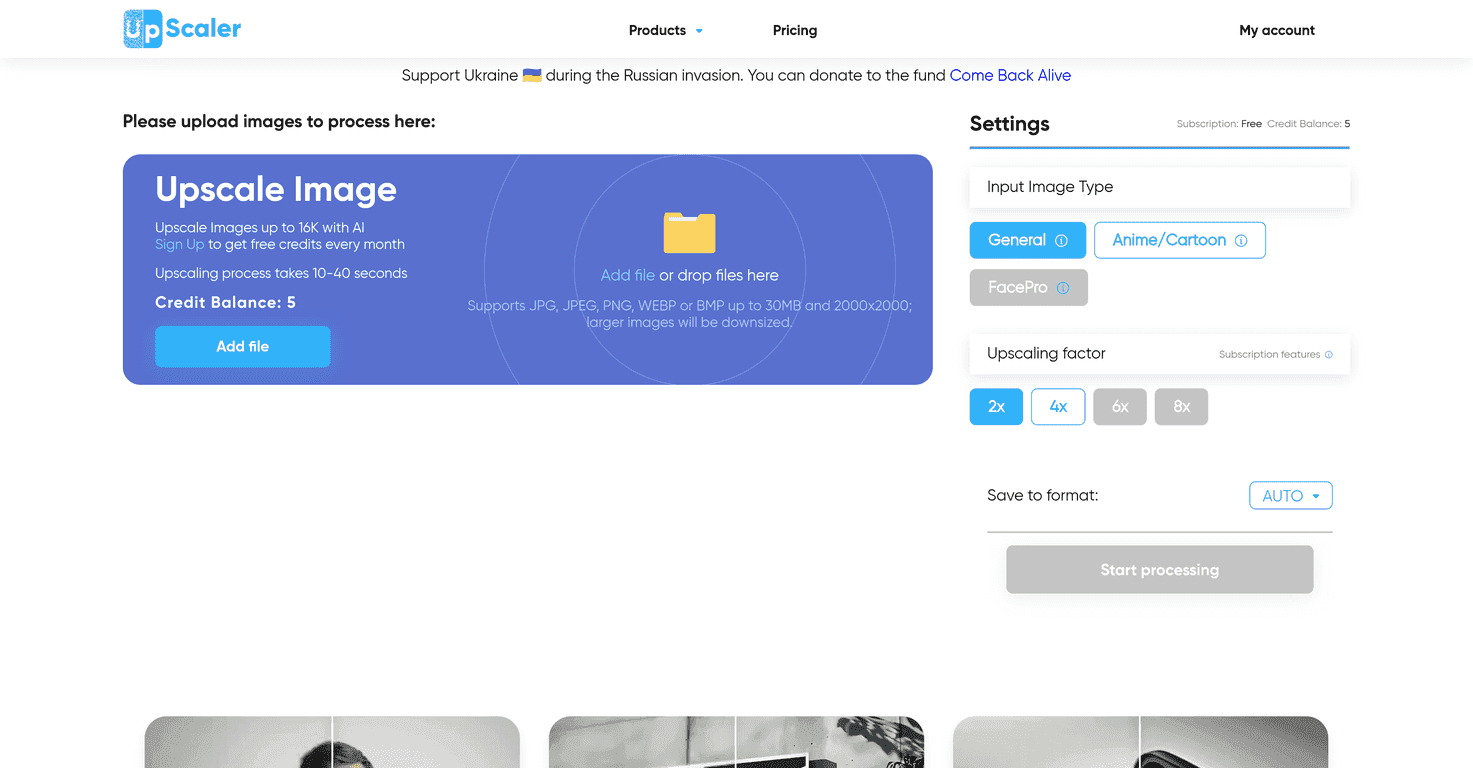
Here’s the simple flow: you upload an image, choose your upscaling factor (like 2x or 4x), and the tool processes it quickly. In my tests, the turnaround felt fast enough that it didn’t kill my momentum. That matters when you’re doing product listings or fixing a batch of images before a deadline.
Also, it’s not just for designers. If you’ve ever tried to print a screenshot, blow up a small photo for a poster, or clean up a compressed image from a marketplace upload, you know how frustrating those results can be. ImageUpscaler is aimed at making that kind of cleanup much easier.
Key Features I Looked For in ImageUpscaler
- AI-powered upscaling for sharper clarity — The main promise here is improved detail without turning your image into a plastic-looking mess. In practice, it helps most on photos with texture (hair, wood grain, fabric) and on graphics where edges need to feel cleaner.
- Multiple formats supported — It supports JPG, JPEG, PNG, WEBP, and BMP. I like that because it means you’re not forced to re-export everything just to test a workflow.
- Upscaling options (2x and 4x) — 2x is usually the “safe” choice when you don’t want artifacts. 4x can look better when the source is decent, but it’s also the setting where you may notice changes if the original is extremely low quality.
- Fast processing time — The site mentions 10 to 40 seconds. That range tracks with what I’d expect depending on file size and how busy the service is at the moment.
- Free credits for registered users — This is important if you just want to test it on a couple of images before committing. I always recommend using the free credits on your “worst” images first—then you’ll know if it’s actually worth paying.
- Simple, beginner-friendly interface — No complicated sliders. You basically upload and choose your factor. That’s a win for non-technical users.
- Security claims for surveillance-style images — The platform mentions security features for enhancing surveillance images. I’d treat that as a marketing point, but it does suggest they’re thinking about sensitive use cases.
- Broad use cases — Personal photos, e-commerce, graphic design, and even medical/scientific contexts are mentioned. Realistically, the best results depend on the source quality, but the target audience is wide.
Pros and Cons (Honest Take After Testing)
Pros
- Noticeable improvement on many image types — I saw better edge definition and less “mushy” detail after upscaling, especially when the original still had some usable information.
- Easy to use — If you can upload a file and click a button, you can use it. There’s no steep learning curve.
- Works with common image formats — JPG/PNG/WEBP support makes it practical for real workflows.
- Free credits help you evaluate quickly — You can test before you pay, which is exactly how it should be.
- Useful for both personal and business needs — I can see this being handy for product photos, social media images, and anyone who needs a quick upgrade.
Cons
- Free credits may run out if you upscale a lot — If you’re doing bulk work (like dozens or hundreds of images), you’ll probably hit the limit sooner than you expect.
- Some images may need resizing first — The tool may behave better if you don’t start with extremely awkward dimensions. If it asks you to reduce resolution, that’s a sign your source might be too heavy or too small to upscale cleanly.
- Not every feature may be available on the free plan — This is common with online tools. If you want the best results or higher limits, you may need to upgrade.
Pricing Plans: What You Should Expect
ImageUpscaler offers free credits for registered users, and then you can purchase additional credits or upgrade for broader usage. In my view, that structure makes sense: try it with a handful of images, then decide if the quality justifies the cost.
If you’re planning to upscale a lot, I’d recommend checking the pricing page before you start. Don’t just assume “online tool = unlimited”—credits and plan limits are usually where people get surprised. The good news is you can test first, so you’re not stuck paying for something that doesn’t match your expectations.
Wrap up
Overall, I found ImageUpscaler to be a solid option when you need faster, better-looking upscales without learning a whole new tool. The interface is straightforward, the processing is quick, and the results are often meaningfully sharper—especially on images that still have decent original detail.
That said, don’t expect miracles on the absolute worst sources. If your original image is extremely blurry or heavily compressed, you might get “better,” but not “perfect.” Still, for product photos, personal images, and quick graphic cleanup, it’s definitely worth trying—especially since you can start with free credits.
Promote ImageUpscaler